Setting up calendars with BusyCal

Quick Overview...
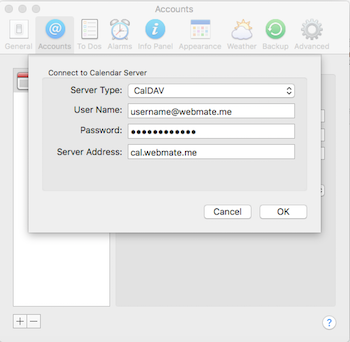
In BusyCal, from the Preferences window, select Accounts and add a new CalDav and enter your email address as a username and the server address as cal.webmate.me.
Detailed Instructions...
Step: #1 - Setup a WebMate Calendar
First of all you will need to set up your WebMate Calendar by following the instructions in This Guide  
Step: #2 - Add the Calendar to BusyCal

Open BusyCal and go to the BusyCal Menu and click on Preferences.
After this click on the Accounts tab.

Busycal 1
Click on the + symbol under the left hand account list then choose CalDav as the server type.

Enter your WebMate email address 
and password and put mail.webmate.me into the Server Address box.

BusyCal should then add your account and its ready for use.

 
  • 47 användare blev hjälpta av detta svar
Hjälpte svaret dig?

Relaterade artiklar

Add WebMate Calendars to the Calendar app

Quick Overview... Add your WebMate calendar details in Calendar under Preferences,...

Setup your Calendar on your iPhone

Quick Overview... To setup WebMate calendars on your iPhone, add an account in...

Sharing Your Calendar

Quick Overview... You can share your calendars with others by entering the email...

Create a Project Calendar in webmail

This article will show you how to toggle the Day, Week, Month or Year Modes and...

Accessing Calendars

To access and configure your calendar you will need to login to...