|
||||
| Step 1: Choose a Mail account provider |
||||
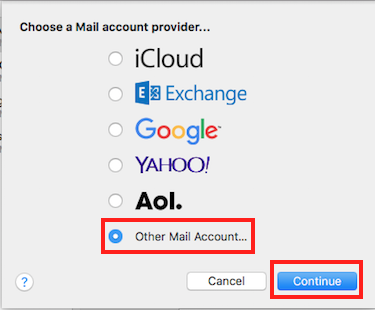
| Go to 'Mail' (top left of your screen) then select 'Accounts' Click the small '+' button on the bottom left of the accounts window. Choose Add Other Account, then Continue. |
 |
|||
| Step 2: Add Email Information (Step 1) |
||||
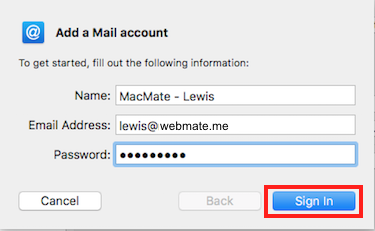
| The first screen simply asks for your Name, the Email Address and your Email Password for that account. Fill these in and click Sign In. Mail will then search for mail servers briefly before stating "Unable to verify account name or password" (This is normal).
|
 |
|||
| Step 3: Add Email Information (Step 2) |
||||
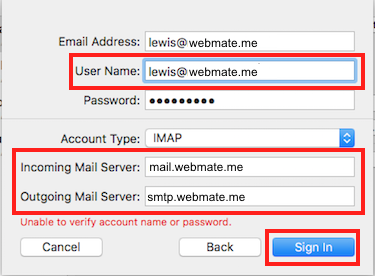
| The second screen asks you for your User Name, the Account Type and both Incoming and Outgoing Mail Servers. Your User Name is your full email address. Your Account Type can be either IMAP (recommended) or POP. Incoming Mail Server needs to be set to mail.webmate.me Outgoing Mail Server needs to be set to smtp.webmate.me Once all the information is entered, click Sign In. |
 |
|||
| Sep 4: Add Apps and Finalising |
||||
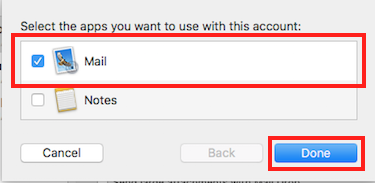
| If the account was verified successfully, you will be asked What OSX Apps to use with the email account - In this case, you need to have Mail ticked. You will be able to use other email accounts if you wish. Once the Apps have been selected click Done. Congratulations - your email account has been added to Apple Mail! |
 |
|||
- 133 Utilisateurs l'ont trouvée utile


To setup your WebMate mail account in Apple Mail, add the account using the details supplied in your email - filling the onscreen prompts. Remember to included the SMTP outgoing server settings and your full email address. Follow the guide below to ensure everything gets set perfectly:
Detailed Instructions...