|
|
||
| Step 1: IMAP SSL Settings |
||
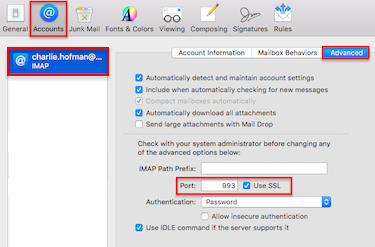
| Open Apple Mail. Go to the Mail menu (top left of screen) and choose Preferences. 1. Select the Accounts button (top left of Preferences panel). 2. Select the account that requires SSL enabling. (from the white panel on the left). 3. Click Advanced in the main panel on the right. 4. Check the box to enable SSL This should automatically change the Port number to either 995 for POP3 accounts or 993 for IMAP accounts. |
 |
|
| Step 2: SMTP SSL Settings |
||
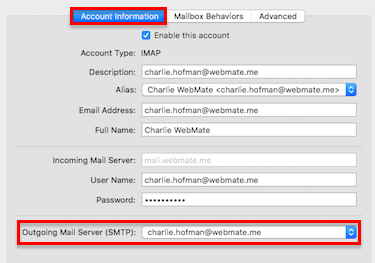
| Ensure Account Information is selected. Then, click on to the drop down menu... Next to where it says Outgoing Mail Server (SMTP): |
 |
|
| Step 3: SMTP SSL Settings |
||
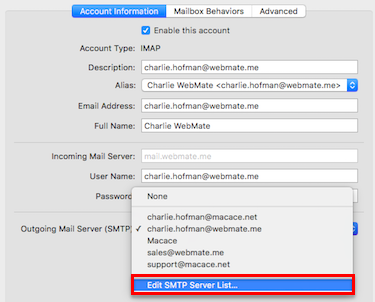
| To get to the outgoing SSL settings... Go to Edit SMTP Server List from the drop down menu. |
 |
|
| Step 4: SMTP SSL Settings |
||
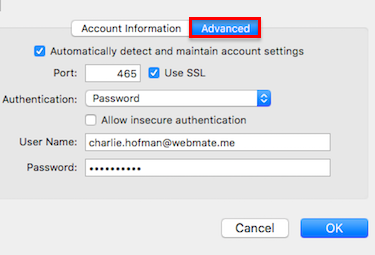
| Click on to the Advanced button. Ensure Automatically detect and maintain account settings is un-checked. Port: 465 Use SSL: Yes Authentication: Password. User Name: Your full email address. Password: Your email account password. When all of the settings are in place click OK Close the preferences window and Save the changes if asked. That's it, your incoming and outgoing secure Socket Layer (SSL) should be enabled. |
 |
|
- 0 משתמשים שמצאו מאמר זה מועיל


Quick Overview...
To enable SSL on your email account in Apple Mail, go to your Incoming and Outgoing mail server settings and make sure that SSL is ticked in the Advanced section for both mail server settings.
Detailed Instructions...