Configuring Entourage

webmate Email Settings

Quick Overview...

You can set up your WebMate email address by going to Tool > Account Settings >  Add New Mail Account. You can then enter your email address, server details and you can then start using Thunderbird for your Mail.

info icon Please note that Entourage is no longer supported by Microsoft. 


Apple Mail image
Step 1: Setup
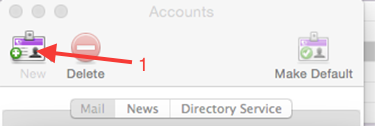
Open Entourage, Go to Tools in the menu bar and choose Accounts.
This will open the add account assistant.

Click New to add a new email account.
setup image
Step 2: New Account
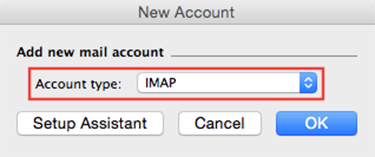
First choose your Account Type POP or IMAP.

info icon POP or IMAP ?
  We recommend using Account Type IMAP as this will sync across all of your devices, you'll be able to add this email account to as many devices as you like.
  If you know that you will only accessing this email account through this one computer you can choose POP.

When you're done click OK

setup image
Step 3: Edit Account
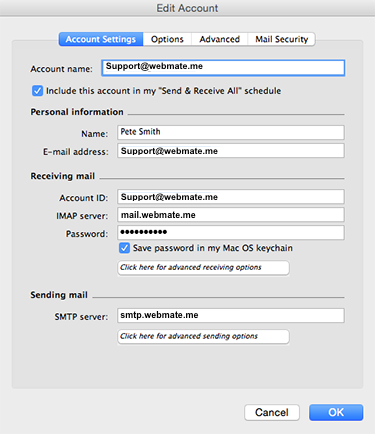
For a basic email account setup you should only need to use the Account Settings tab.

The Account name is just a description for this particular email account, using your actual email address could save any confusion later if more accounts are added.


Personal Information:
In this section you just need to add your Name and E-mail address.


Receiving mail:
Account ID Your full email address
IMAP Server mail.webmate.me
Password Your email Password
More info for the advanced receiving options below


Sending mail:
SMTP server: smtp.webmate.me
More info for the advanced sending options below
setup image
Step 4: Advanced receiving options
Advanced receiving options

To get to the Advanced IMAP settings, click on the button that says.
Click here for advanced receiving options
Configure the (incoming) settings as below...

  • Check the box to enable SSL (Secure Sockets Layer)
  • Choose port 993 if using IMAP
  • Choose port 995 if using POP

Click the square in the top left corner to close the window.

info image When you set the Account Type to IMAP or POP, the Default ports given by the email software will be fine.


imap settings image
Step 5: Advanced sending options
Advanced sending options

To get to the Advanced SMTP settings, click on the button that says.
Click here for advanced sending options
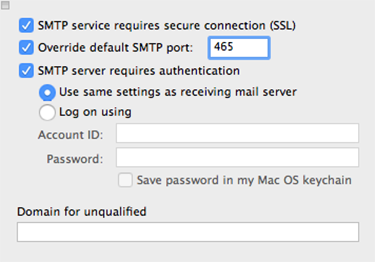
Configure the (outgoing) settings as below...

  • Check the box to enable SMTP service requires secure connection
  • Choose port 465 for IMAP or POP
  • Check the box for SMTP server requires authentication
  • Check the box to Use the same settings as receiving mail server

Click the square in the top left corner to close the window.

Once all details have been carefully entered, click OK.
The account setup is now complete.

setup image
 
  • 95 Користувачі, які знайшли це корисним
Ця відповідь Вам допомогла?

Схожі статті

Importing your contacts into WebMail

To import your contacts onto WebMail just export your contacts onto your desktop...

Restore the preview panel in Apple Mail

In Apple Mail, if the email preview panel is missing – how to do I get it...

Migrating from POP to IMAP - Apple Mail

Quick Overview...Deactivate your POP account and drag the emails from your POP...

Scanning for Malware with Avast! For Mac

Quick OverviewClick here to install AVAST. Once it is installed onto your Mac open...

How to enable SSL in Apple Mail (OSX 10.10 - 10.11)

Quick Overview...To enable SSL on your email account in Apple Mail, go to...