How do I add sub accounts and contacts to my account via the billing portal.


Quick Overview...

You can add sub contacts to your account via your WebMate Billing portal.
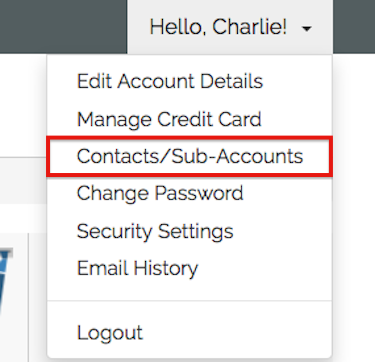
Click on your name top right of the billing area and choose Contacts/Sub-Accounts from the menu.
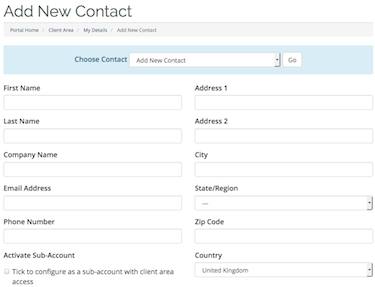
Add the new contact details and check the boxes to determine what the new contact can access within the account.


info icon   What's the difference between a contact and a sub account?
Contact - this is when you want the user to be able to receive notifications (you can set which) and send support tickets. The user will not have any rights to your account nor will they be able to login to the account. This is useful to ensure, for example, your IT guy gets technical notifications. Sub-Contact - when the "Activate Sub Contact" is selected, the user can login to your account as themselves and you can set what permissions they have, see section 4 below. This is useful when more that one owner of a company requires full access to everything, or when your accounts team need access to billing.


Detailed instructions...


Step 1: Add Contacts & Sub-Accounts
Click on your name top right of the billing area and choose
Contacts/Sub-Accounts from the menu.
Step 2: Add the new user information
Add the new contact details to the form, Name, Address, Email Address etc.
Step 3: Preferences
Check the boxes to determine what the new contact can access within the account.
Step 4: Activate Sub-Account (if required, see note below)
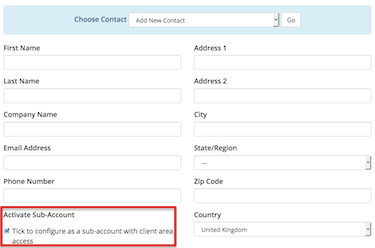
You should only activate sub-account if you want to give the contact further access and their own login.

To activate the Sub-Account you will need to tick the Activate Sub-Account check box.
 
  info icon image  We use the contact and sub contact permissions to allow phone and email access to account info too - so please ensure they are kept up-to-date.
If you want any other specific sub-account or contact instructions, please let us know and we can add a note on your account.

Step 5: Permissions

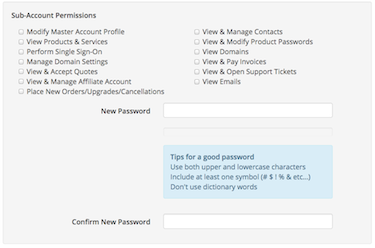
Once the account is activated you will see a Sub-Account permissions pop up.

In here you can select what permissions they have on the account and also setup a password unique for the new contact to log in to billing.

  • 101 Els usuaris han Trobat Això Útil
Ha estat útil la resposta?

Articles Relacionats

How do I check the Network status for WebMate

Quick Overview... To check the network status of WebMate, Log in to WebMate Billing with...

Check & update your credit card details

To update your credit card details, login to WebMate Billing with your registered...

How to change to annual or monthly billing

Quick Overview...You can change the billing frequency to Annually or Monthly in the...

How to Open/Create a New Support Ticket

Quick Overview... A ticket can be created for Technical Support, Accounts & Billing...

Paying invoices with WebMate Billing.

How do I pay my invoices in WebMate Billing? Quick Overview To Check and pay...